How to Make Brat Text with a Transparent Background
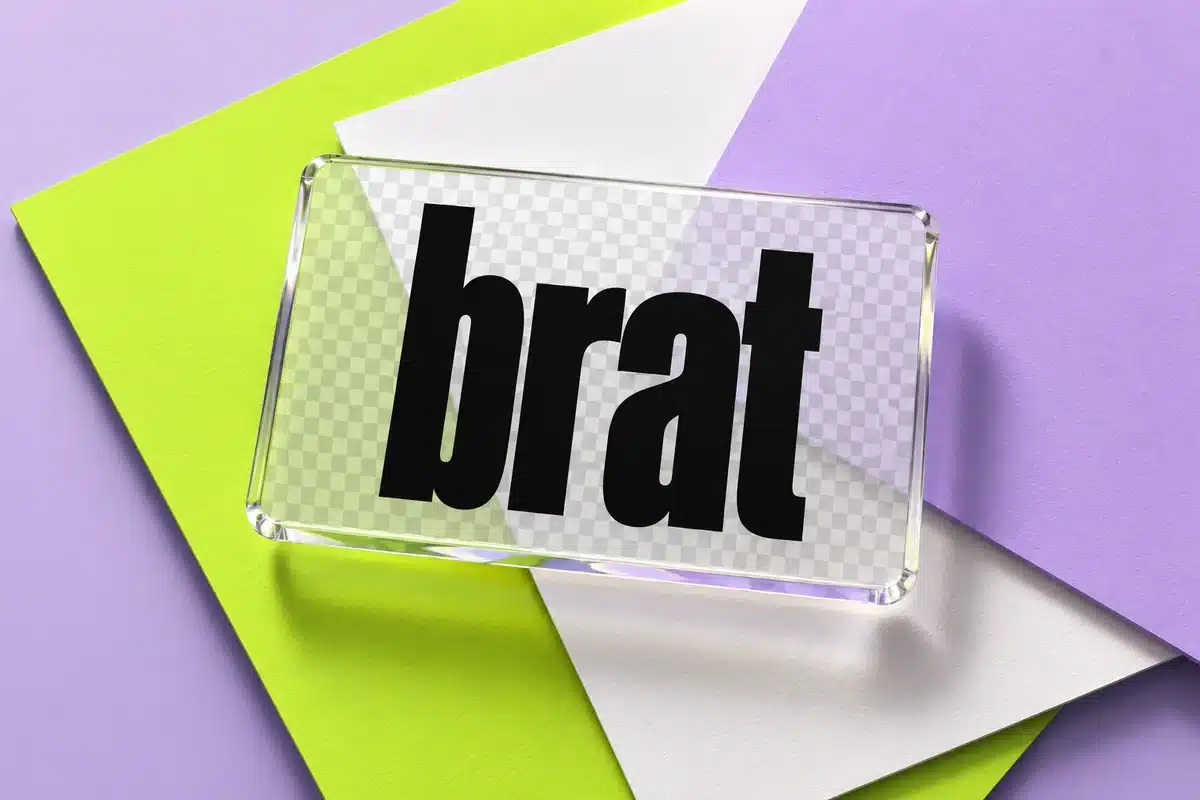
To create Brat text with a transparent background, make a clear text image, remove its solid background in an editor, and export the result as a PNG that preserves transparency. Then test it over another image. A PNG file can still contain a solid background, so the extension alone does not prove that the artwork is transparent.
Our brat generator provides a starting point for the lettering. Its current canvas uses a solid background, so this workflow includes a separate editing step. You will finish with reusable text artwork for collages, presentation slides, or other designs that need the background to show through.
Understand what transparency changes
A normal Brat-style image places a word on a colored rectangle. A transparent version removes that rectangle while keeping the letters. When you place it over a photo, the photo remains visible between and around the letters.
Transparency is separate from white. White pixels cover whatever sits underneath them; transparent pixels allow the lower layer to show. Many editors represent empty areas with a gray checkerboard, but that checkerboard is an interface aid. It should not become part of your final image.
Removing the background also changes the design's character. The familiar green field no longer does the work of identifying the aesthetic. The lowercase lettering, proportions, spacing, and surrounding composition need to carry more of that visual connection.
Prepare an image that is easy to edit
Use a short word with clear separation
Start with a short phrase and a square canvas. Keep the text away from the edges so you have room to inspect and crop it later. If you need help choosing a readable treatment, the site's Brat font explanation provides background on the typography.
Choose strong contrast between the letters and background. Black text on white is a practical editing source, even when your final design will use a different setting. Avoid starting with lettering and a background that are nearly the same color.
Reduce blur before removing the background
Heavy blur blends letter edges into the background. If black text is blurred over green, the edge pixels can contain green as well as black. Removing only the obvious background may leave a colored fringe around the letters.
For a clean overlay, begin with little or no blur. You can decide whether to soften the isolated text afterward. This order keeps the background-removal step simpler and gives you more control over the final edge.
Download the original PNG
Use the download control to save a PNG source. Avoid a screenshot, which may introduce extra borders or capture the artwork at a smaller displayed size. Keep the original file unchanged and work on a copy in your editor.
Give the file a descriptive name, such as “weekend-text-source.png.” Saving both source and finished versions makes it easier to revise the phrase later without rebuilding every design choice.
Remove the background with Photopea
Photopea's background-removal tutorial explains the basic sequence: select the background, clear the selection, and export as PNG. Open your saved text image with File, then Open. Confirm that you are working on the layer containing the artwork.
Select Magic Wand and click the solid background. Check the highlighted area before deleting anything. The selection should include the background while leaving the letter shapes intact. If your source layer is a Smart Object, rasterize it before clearing pixels, as described in Photopea's tutorial.
Use Edit, then Clear, and inspect the result. Empty areas should reveal the editor's checkerboard. If the letters disappear instead, undo the change and correct the selection. Keep the untouched source available so mistakes remain easy to reverse.
Clear the spaces inside the letters
Words containing letters such as “a,” “b,” “d,” “o,” and “p” may leave enclosed background areas after the outer background is removed. Those small islands matter: they become obvious when the artwork is placed over a contrasting image.
Photopea's advanced selection guide explains the Contiguous control. When it is enabled, Magic Wand selects connected similar pixels. Disabling it allows similar colors elsewhere in the image to be selected too. That can help include enclosed spaces in a flat text graphic.
Inspect the selection before clearing it. Increase tolerance cautiously if unwanted background remains; a higher tolerance selects a broader color range and can also eat into softened letters. Undo and compare if thin strokes become damaged. There is no single tolerance number that works for every source.
Inspect the edges on several backgrounds
A transparent image can look clean on the editor's checkerboard and still have visible halos elsewhere. Place a temporary dark layer behind the text, then try a light layer and a saturated color. The different backgrounds make remaining edge pixels easier to see.
For black lettering, a pale fringe is most obvious on a dark background. A green fringe may blend into green artwork but stand out over pink. Judge the file against the backgrounds where you expect to use it, not only against the original color.
If the halo is strong, return to the source and reduce blur rather than repeatedly erasing around each letter. For delicate lettering, rebuilding the text on a transparent layer may produce a cleaner result than extracting a heavily blurred image. Keep the wording and proportions as your reference.
View the design at its intended display size as well as enlarged. Magnification helps find stray pixels, but the practical question is whether the finished words look clear in the composition.
Export and verify the transparent PNG
Hide any temporary background layers you added for inspection. Choose File, Export As, then PNG, and save a new file. Keep the editable project separately if you want to preserve layers for future changes.
Do not convert the result to JPEG when you need transparency. Also avoid flattening the artwork onto a white layer before exporting. Either action can leave you with the same rectangular background you were trying to remove.
Reopen the exported PNG and place it over a colored shape or photograph. If the lower image shows through around the letters and inside their enclosed spaces, the transparency is working. If a checkerboard moves with the image, that pattern is baked into the pixels and needs to be removed.
Use the overlay without losing readability
Transparent lettering needs contrast with whatever sits underneath it. Black text can disappear on a dark photo even when the file is technically correct. Move it to a lighter area, create a light version, or use a subtle backing shape when the composition needs one.
Leave space around the words instead of stretching them across a busy face or detailed object. For a collage, place the text where it feels attached to the composition: beside the subject, along a clear edge, or within an area of open color.
For short-form video, import the PNG as an image layer in your video editor. The site's Brat Generator versus CapCut comparison explains the broader handoff between static artwork and video editing. Preview several moments because the background may change while the text stays in place.
If you intend to make physical stickers, check the printer's requirements separately. Transparent pixels in a file do not determine the material, white-ink handling, or cut line of a printed sticker. The Brat sticker guide covers the design-to-print workflow.
Keep versions for different backgrounds
Save separate dark-text and light-text versions when you expect to use the overlay repeatedly. Give the filenames clear endings, such as “black-transparent” and “white-transparent.” This prevents choosing the wrong version when a preview appears blank against the viewing app's background.
Retain an editable master and record the text settings. A transparent export is convenient for placing artwork, but it does not automatically preserve editable letters. If you later need different wording, return to the source rather than stretching or painting over the finished file.
Frequently asked questions
Is every PNG transparent
No. PNG can preserve transparent pixels, but a PNG may also contain an opaque image. Verify the exported artwork by placing it above another image and checking the spaces around the lettering.
Can the current generator remove the background itself
The current generator uses a solid canvas background and exports static images. Use a separate editor for this workflow. Do not assume selecting PNG automatically removes the background color.
Why is there green around my black letters
Blur or softened edges can mix the lettering with the original green background. Create a cleaner source with less blur, remove the background again, and test the edges on both light and dark colors.
Why does my transparent image look blank
Its text may match the viewer's background, or the selection may have removed the letters. Place it over a contrasting color to check. If the letters are missing, return to the original source.
Can I make the finished overlay larger
You can resize it, but enlarging a raster image may soften its edges. Start with a large source and keep the original. For substantial size changes, recreate the artwork rather than relying on repeated enlargement.
How do I make a transparent PNG?
Export in PNG format, and make sure your editor or tool is set to preserve transparency.
Why does my transparent image have a white box?
The file may have been exported as JPEG, which does not support transparency.
Where can I use a transparent PNG?
On slides, videos, stickers and layered designs, wherever the software supports PNG transparency.
Brat Generator is an independent tool and is not affiliated with, endorsed by, or sponsored by Charli XCX, her record label, or any related brand. Any album or trademark names are mentioned only to describe a visual style.